


SolaX Developer API integration to monitor and control your SolaX system in Home Assistant using the official SolaX Developer OpenAPI.
Automatically discovers authorized plants and devices, creates per-device sensors, and provides a system-wide overview with total sensors. Requires no YAML configuration or template sensors.
If a local Modbus setup is not an option for your system (or not working), this is the cloud-connected alternative for SolaX hardware that gives you the same amount of sensors and control of your EV charger and inverter work-mode controls.
Great if you want a feature-rich, read-safe Developer API integration for SolaX residential and C&I systems in Home Assistant. Supports inverters, batteries, meters, EV chargers, and confirmed EMS systems where available.
- ⚡ Inverter, battery, meter, EV charger, and EMS support
- 🔋 Opt-in inverter work-mode profiles for Self Use, Feed-in Priority, Back Up, and Manual where supported, with named device buttons for automations
- 🚗 Opt-in EV charger controls on discovered charger devices
- 📊 Automatic plant, device, and system-wide total sensors, including SolaX alarm support
- 🚨 Native SolaX alarm monitoring with Active Alarm Count, Home Assistant persistent notifications, and the detailed Alarm Viewer
- 🧠 Dynamic sensors based on real Developer API data received
- 🧩 Manual meter and EMS onboarding when inventory endpoints omit readable devices
- 🔌 Works with residential and C&I SolaX systems
- 🛠️ No YAML or template sensors required
- 🌍 26-language translation layer
- 🇬🇧 🇩🇪 🇳🇱 🇨🇿 🇵🇱 🇵🇹 🇧🇷 🇪🇸 🌎 🇮🇹 🇫🇷 🇸🇪 🇩🇰 🇳🇴 🇫🇮 🇱🇹 🇨🇳 🇯🇵 🇹🇭 🇻🇳 🇧🇬 🇬🇷 🇭🇺 🇷🇴 🇹🇷 🇺🇦
- 💎 Home Assistant Platinum-standard aligned
Cards included
- 📈 Built-in SolaX History Viewer Card to fetch and view SolaX account history rather than Home Assistant Recorder history
- 🚨 Built-in SolaX Alarm Viewer Card for manual ongoing/closed alarm lookup from SolaX
- 🚀 Built-in Card-Aware Live View polling with API budget protection if your system supports live view.
Diagnostics
⚠️ Built-in API error, permission, quota, and rate-limit reporting- 🧰 Privacy-safe diagnostics with raw and filtered API response views
This integration is developed and tested against real SolaX Developer API responses and Home Assistant installations. Contributions, issues, and pull requests are welcome.
Important
EV charger controls can send real SolaX write requests only after you explicitly enable EV Charger Controls in integration options. Inverter work-mode device actions require their own opt-in and an individually reviewed mode profile.
Keep both control options disabled if you want a read-only installation.
Direct solax_developer_api.set_evc_* services and set_charge_scene require a Home Assistant administrator. Native EV charger and inverter mode entities follow Home Assistant entity control permissions.
The existing inverter, battery, grid, VPP, and EMS control services remain hard-blocked dry-runs. Reviewed inverter modes use only the new device actions.
This custom integration is built and validated as a 💎 Platinum-standard aligned custom integration following the Home Assistant Integration Quality Scale:
- Platinum-standard aligned: https://developers.home-assistant.io/docs/core/integration-quality-scale/
- Strict typing: CI checks all integration modules against the Home Assistant stable mypy interfaces.
- Test coverage:
97.08%, enforced by CI with a minimum threshold of96%and more than95%coverage in every production module. - Automated tests:
253credential-free tests plus7Home Assistant lifecycle fixture tests. - Home Assistant versions tested for this version: main suite on
2026.1.0and2026.11.0; lifecycle suite on2026.1.0and2026.10.4. - Config-flow coverage:
99%on the current stable test run.
Note
This is a community custom integration, installed through Marketplace (Home Assistant 2026.11+) or HACS (older versions), and is not included in Home Assistant Core.
Complete feature summary
- Single Integration Instance - One config entry covers every plant and device authorized for the Developer API application.
- Developer API Authentication - Uses OAuth client credentials with automatic access-token renewal.
- Official Reauthentication - Home Assistant starts a reauthentication flow when SolaX rejects stored credentials.
- Residential and C&I Discovery - Queries both
businessType=1andbusinessType=4. - All Main Device Families - Inverters, batteries, meters, EV chargers, and confirmed EMS systems.
- Dynamic Sensor Creation - Creates sensors from non-null fields returned by the API.
- Capability Memory - Remembers previously observed device fields so temporarily offline devices retain their entity model.
- Unavailable-Sensor Filtering - Capability-only fields start disabled and are automatically enabled if real data later appears.
- Plant Telemetry - Realtime plant values, inventory metadata, alarms, and annual/monthly statistics.
- Device Telemetry - Realtime device values grouped and batched by device type, business type, and serial number.
- System Totals Device - AC/DC power, yield, efficiency, health, polling, Live View, and API diagnostics.
- Transparent Calculations - Total sensors expose attributes showing which devices or plants contributed.
- Manual Meter Support - Validates accessible meters that are missing from device inventory before saving them.
- Manual EMS Support - Available for relevant C&I systems and validated through the dedicated EMS endpoint.
- Duplicate Protection - Already discovered devices are not added again as manual devices.
- Adaptive Polling - Standard, night, and temporary realtime-focused Live View profiles.
- API Budget Protection - Live View automatically increases its effective interval when necessary to stay within its configured call budget.
- Transient Error Retention - Last good values remain available during temporary API, network, rate-limit, or quota failures.
- Deterministic Retry Backoff - Failed refresh cycles back off instead of repeatedly hammering the API.
- Home Assistant Repairs - Surfaces active rate/quota limits and incomplete endpoint permissions.
- Capability-Gated Services - Device-specific services are registered only when matching equipment is present.
- On-Demand History Reads - Device history requests are split into API-safe serial and time-range chunks.
- Built-in Live View Controller - Optional Lovelace card renews Live View while its dashboard view is open.
- Built-in Alarm Viewer - Optional Lovelace card fetches ongoing or closed plant/device alarm records on demand.
- Official Diagnostics Export - Includes raw API envelopes, filtered entity-driving data, and raw-versus-filtered field summaries.
- Privacy Redaction - Credentials, tokens, serials, plant identity, account identity, address, and coordinates are sanitized.
- Full Translation Layer - English (
en) default/fallback plus German (de), Dutch (nl), Czech (cs), Polish (pl), Portuguese (pt), Brazilian Portuguese (pt-BR), Spanish (es), Latin American Spanish (es-419), Italian (it), French (fr), Swedish (sv), Danish (da), Norwegian Bokmål (nb), Finnish (fi), Lithuanian (lt), Simplified Chinese (zh-Hans), Japanese (ja), Thai (th), Vietnamese (vi), Bulgarian (bg), Greek (el), Hungarian (hu), Romanian (ro), Turkish (tr), and Ukrainian (uk). - Safe Control Architecture - Non-EV control payloads use schema validation, auditing, and hard-blocked dry-run output. EV charger commands additionally require explicit opt-in, a discovered charger target, and SolaX request-status confirmation.
Before installing the Home Assistant integration, create and authorize a SolaX Developer API application.
You need:
-
Home Assistant 2026.1.0 or newer
-
SolaX Developer Portal access
-
A Developer API application
- This provides the Client ID and Client Secret used by the integration.
-
Authorized read services
- Your Developer API application must have permission to read the relevant SolaX plants and devices.
-
The correct API region (Select this during setup in Home assistant)
- EU:
openapi-eu.solaxcloud.com - CN:
openapi-cn.solaxcloud.com - IN:
openapi-in.solaxcloud.com
- EU:
-
This is how to get the correct region for you:
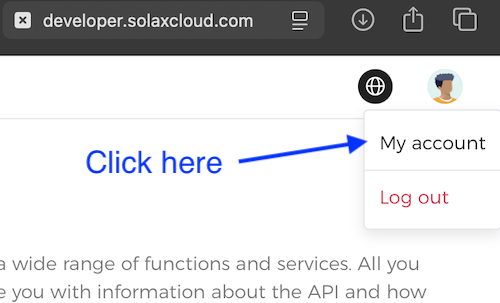
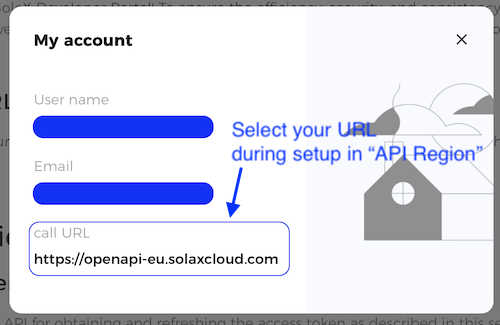
Open the SolaX Developer Portal, sign in, and start from Quick Start or Application.
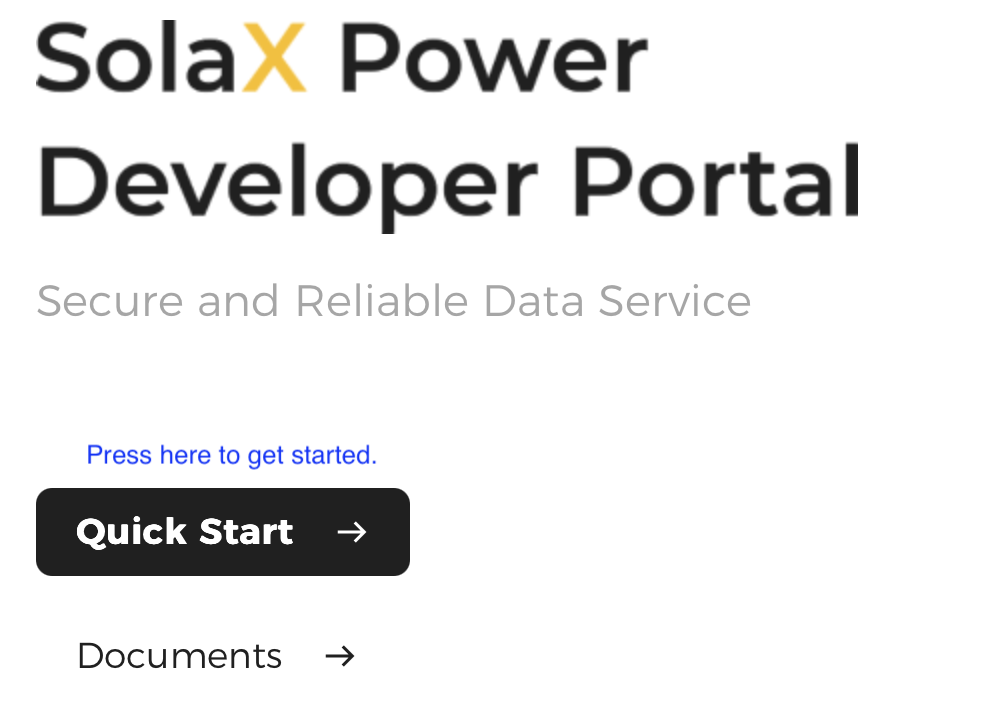
Go to Application and create a new application, or open an existing application that should be used for Home Assistant.

Open the application's Authorization tab and copy the Client ID and Client Secret. These are entered in the Home Assistant config flow.

Open Service API, select Authorize, and authorize the read/monitoring services required for this integration:
- Data Monitoring Service (
API_Telemetry_V2) - Information Access Service (
API_Info_V2)

For normal monitoring, authorize only the read services above. Control service packs are optional; direct inverter, battery, grid, VPP, and EMS services remain dry-runs in this integration.
After adding the integration to Home Assistant, you can separately enable EV Charger Controls or Inverter work-mode controls. Both start off. See the illustrated settings guide to enable controls and create an inverter profile.

The integration validates both authentication and read access during setup. A token alone is not considered a successful configuration unless at least one plant-information request succeeds.
This integration is in the community catalog; you do not need to add a custom repository. The button above opens it in either Marketplace or HACS.
Home Assistant 2026.11 or newer: Open Settings → Marketplace, search for SolaX Developer API for Home Assistant, open its page, and select Install. Marketplace is built into Home Assistant and replaces HACS in these versions.
Home Assistant 2026.1 through 2026.10: Install and configure HACS if needed. Open HACS, find SolaX Developer API for Home Assistant, and select Download.
Restart Home Assistant if prompted. Then go to Settings → Devices & services → Add integration, search for SolaX Developer API, and complete the initial setup.
Manual installation
- Download the latest release.
- Download and extract the release asset solax_developer_api.zip. For an
older release without that asset, extract GitHub's Source code (zip) and
open its
custom_components/solax_developer_api/folder instead. - Create
/config/custom_components/solax_developer_apiif it does not exist. - Copy the extracted files directly into that directory so
manifest.jsonis located at/config/custom_components/solax_developer_api/manifest.json. - Restart Home Assistant.
- Add SolaX Developer API from Settings → Devices & services.
- Go to Settings → Devices & services.
- Open SolaX Developer API.
- Open the integration menu (
⋮) and select Delete. - Restart Home Assistant if prompted.
- Open Marketplace or HACS, whichever your Home Assistant version uses, and remove SolaX Developer API for Home Assistant after deleting the config entry.
Deleting the config entry unloads all platforms, removes integration services when no loaded entry remains, clears transient notifications and repair issues, and leaves Home Assistant's historical recorder data under Home Assistant's normal retention rules.
- Go to Settings → Devices & services.
- Click Add integration.
- Search for SolaX Developer API.
- Enter:
- Client ID - From the SolaX Developer Portal application.
- Client Secret - From the same application.
- System Name - Used for the System Totals device and stable entity prefix.
- Scan Interval - Standard polling interval in seconds. Default:
120. - API Region - EU, CN, or IN.
- Submit the form.
The integration verifies the credentials and plant read access, then discovers authorized plants and devices. This first-time form uses Home Assistant's standard setup flow. The GUI settings page becomes available after setup.
Go to Settings → Devices & services → SolaX Developer API → Configure. The GUI is an administrator-only page inside Home Assistant; it has no sidebar item or dashboard card. GUI and Classic configuration save to the same integration settings. Saving changes reloads the integration.
Select GUI configuration (Recommended). Classic configuration remains available below it.

Select Open SolaX settings. The page has General, Polling & Live View, Devices, Workmodes, and Advanced tabs. You can also bookmark /solax-developer-api-settings in your Home Assistant instance.

In Advanced, enable EV Charger Controls or Inverter work-mode controls separately, then select Save settings. Both are off by default. When enabling either control, read and acknowledge the risk dialog before the settings are saved. Monitoring works without enabling controls.

Open Workmodes, select an inverter and mode, then select Create profile. Enter a name and the settings your inverter needs. Time periods are optional for compatible modes; period-2 clocks become available when Enable time period 2 is on.

The profile appears in the list, where you can Edit or Delete it. Saving creates an activation button on the inverter device; it does not send a mode command. Deleting a profile removes its button, so update automations that use it.

On the inverter device page, select Press on the profile button. Automations can use Home Assistant's Press button action on the same entity.

Control options and important limitations
- Standard inverters offer Self Use, Feed-in Priority, Back Up, and Manual (stop, force charge, or force discharge). Self Use and Back Up require a grid-charging choice. A1-Hybrid-G2 offers Self Use and Feed-in Priority without user settings, plus Back Up with its required grid choice and charge start/end times. A1 Manual mode and TOU configuration are not included. The integration reads
businessTypefrom the inverter; you do not enter it. - Standard profiles can include up to two charge and discharge periods. Overlaps are accepted; a user reports that charging takes priority, but verify this on your inverter. SolaX does not document whether omitted times preserve its existing schedule. Set explicit periods for tariff profiles. Allowing grid charging does not force immediate charging. Overnight periods such as 22:00–06:00 are not yet validated on a real inverter. Classic configuration keeps period-2 clocks visible for compatibility with Home Assistant 2026.1.
- A press sends a command, but the button has no selected state. SolaX can accept a request while device acknowledgement is still pending; redacted diagnostics include recent outcomes, status codes, and confirmation attempts. An explicit device failure raises an error. The inverter
deviceStatussensor may show Self Use (150), Back Up (152), Feed-in Priority (153), or Debug Mode (171), butnullor other statuses cannot reliably identify the current work mode. EV chargerdeviceWorkingModeis a separate field. - A compatible EV charger gains device buttons, selects, number fields, text fields, and reserve-charge time fields when EV Charger Controls is enabled. Its device controls use the same validated execution path as EV service actions. Existing direct non-EV control services remain dry-runs even when inverter mode buttons are enabled.
Select Configure → Classic configuration if you prefer Home Assistant's existing settings forms:
| GUI tab | Classic menu |
|---|---|
| General | Credentials and system |
| Polling & Live View | Polling and Live View |
| Devices | Manual devices |
| Workmodes | Inverter work-mode settings, shown after controls are enabled |
| Advanced | Advanced and diagnostics |
Changed credentials are validated before saving. Existing single-mode settings appear as a Default profile with the same button entity ID.
Most devices are discovered automatically. Some meters can be queried by serial number even though SolaX does not return them from the regular device inventory endpoint.
To add one:
- Open Configure → Classic configuration → Manual devices (or the Devices tab in GUI configuration).
- Enter one meter serial per line.
- Optionally add
|1or|4to specify the business type. - Submit the form.
Examples:
METER_SERIAL
METER_SERIAL|1
METER_SERIAL|4
Before saving, the integration:
- Checks whether the meter is already auto-discovered
- Tries the supported business types
- Requires matching realtime meter data
- Records the fields actually returned
- Prevents duplicate manual devices
Saved manual meters appear in the same options page and can be selected for removal.
EMS discovery normally uses the C&I master-control relationship. If a compatible C&I account can read an EMS that is not discovered automatically, the options page can accept:
EMS_SERIAL|PLANT_ID
The dedicated EMS attribute endpoint must validate the serial and plant before the system is saved.
EMS entities and controls remain hidden until an EMS is confirmed. Manual EMS options are shown only for a relevant C&I plant or an existing manual EMS entry, allowing an inventory-omitted EMS to be validated without exposing EMS settings to unrelated residential systems.
The integration automatically registers all three bundled cards with the Home Assistant frontend. After restarting Home Assistant and completing integration setup, open Edit dashboard → Add card and search for SolaX. No manual dashboard resource is required, and the integration never adds a card to a dashboard without your choice.
If you upgrade from a release where you manually added the three /api/solax_developer_api/frontend/... resources, you can remove those old entries from Settings → Dashboards → Resources. They are harmless if left in place because the card modules protect against duplicate registration, but they are no longer needed.
Keeps the temporary Live View polling profile active while its dashboard card is open and shows the remaining time, polling interval, API budget, and heartbeat status.
Regular view

Compact view

Details
The card renews Live View while it is mounted. When the dashboard view closes, its heartbeat stops and Live View expires automatically.
type: custom:solax-live-view-controller
entity: switch.YOUR_SYSTEM_live_view_mode # optional
minimal: false                   # optional, set true for compact single-row view
duration_seconds: 120            # optional
heartbeat_seconds: 45            # optional
interval_seconds: 10             # optional target; minimum 10 seconds
The entity line is optional. If omitted, the card tries to auto-detect the first SolaX Live View switch.
For a compact card, use:
type: custom:solax-live-view-controller
minimal: true
No browser_mod or other integration is required. The requested interval is a target; the integration can automatically select a slower effective interval to protect the configured API call budget.
Fetches and charts SolaX account device history and plant statistics on demand without writing the results to Home Assistant Recorder or long-term statistics.

Details
Recommended default config:
type: custom:solax-history-viewerOptional advanced config:
type: custom:solax-history-viewer
default_range_hours: 6
max_selected_fields: 6
default_scale_mode: zero # optional: zero or auto
The integration supports one configured Developer API account. The card automatically uses that account and lists every authorized device and plant loaded by the integration.
Device History mode
- The card loads discovered inverter, battery, meter, and EV charger devices from the integration.
- Inverters are auto-selected by default; you can select all devices in a family, one device, or any subset.
- Press Fetch History to call
solax_developer_api.fetch_device_history. - Numeric fields actually returned by the API appear as selectable chips and are charted per device.
Synthetic calculated total lines are intentionally not drawn because device-history timestamps can differ between inverters. Device History is capped at Week in the UI, with automatic resolution:
1h,3h,6h,12h:5 minDay:15 min2 days,3 days:30 minWeek:60 min
The SolaX device-history API accepts a maximum of 12 hours per request. The integration splits longer ranges into safe windows and fetches selected devices one serial at a time so multi-inverter charts receive complete per-device rows. Multi-day and week results include day drilldown chips.
Device History charts include Zero baseline and Auto zoom scale modes. Auto zoom makes stable values such as grid frequency or voltage changes easier to see.
Plant Statistics mode
- Select a discovered plant and choose Year or Month.
- Press Fetch Statistics.
- Numeric metrics appear as selectable chips and are charted in the card.
Current-year views fetch January through the current month; previous years fetch January through December. Clicking a month fetches that month, and clicking a day switches to Device History for that exact day. Pointer and touch tooltips show each visible series value.
Fields are discovered from the fetched response because SolaX history and statistics fields vary by model, firmware, topology, business type, and account permissions.
Fetches detailed ongoing or closed SolaX alarm records on demand, complementing native Active Alarm Count monitoring and Home Assistant persistent notifications.

Details
The card queries the documented GET /openapi/v2/alarm/page_alarm_info endpoint only after you press Fetch Alarms. It does not write returned records to Home Assistant Recorder.
Normal integration polling separately creates a native Home Assistant persistent notification when SolaX reports active alarms. Active Alarm Count remains the source of truth for automations, while the notification summarizes up to three returned alarm details.
Recommended default config:
type: custom:solax-alarm-viewerOptional advanced config:
type: custom:solax-alarm-viewer
max_pages: 20                    # optional, 1-100 per plant/state
The card automatically uses the integration's configured Developer API account.
The card lists the plants and devices already loaded by the integration. Select all plants, one plant, or one device; choose All, Ongoing, or Closed; then press Fetch Alarms. Returned records show summary fields and expandable full returned fields. Choosing all plants queries each loaded plant and pages results up to max_pages.
| Setting | Default | Supported range |
|---|---|---|
| Standard scan interval | 120 seconds | 60-3600 seconds |
| Active-alarm scan interval | 120 seconds | 60-3600 seconds |
| Live View duration | 300 seconds | 30-3600 seconds |
| Live View target interval | 10 seconds | 10-60 seconds |
| Live View call budget | 20 calls/minute | 5-100 calls/minute |
| Night scan interval | 600 seconds | 120-7200 seconds |
| Night period | 23:00-06:00 | Configurable |
Important behavior:
- Developer API limit - The documented account limit is 100 calls per minute.
- Budget-first Live View - The effective interval can be slower than requested when the current plant/device topology would exceed the selected call budget.
- Useful-data floor - Live View never polls faster than every 10 seconds because faster requests do not provide fresher SolaX realtime samples.
- Independent alarm monitoring - Active alarms are checked on their own schedule during standard, night, and Live View operation. Successful zero-alarm responses clear prior alarm state; temporary failures retain the last-good state.
- Realtime-focused Live View - Heavy inventory and automatic statistics paths are skipped during temporary Live View polling, while the independent alarm monitor continues.
- Reserved alarm budget - Live View interval calculations reserve the estimated calls required by scheduled alarm monitoring.
- Manual historical reads - Device History, card year/month plant statistics, and Alarm Viewer pagination call SolaX only after an explicit user action.
- Night throttling - The slower night profile is selected during the configured local hours.
- Automatic token renewal - Tokens are renewed before expiry, using a 24-hour safety target for long-lived tokens.
- Auth retry - An API authentication rejection triggers one forced token refresh before failing.
- Stale-data retention - Existing values are kept during temporary failures.
- Independent inventory discovery - A failed residential or C&I inventory request does not block discovery for other business types or device families. Failed requests retain previously discovered records, including attached batteries; successful complete responses remain authoritative.
- Official update failure state - A cycle with no fresh usable endpoint data is reported to Home Assistant as a failed coordinator update. Authentication, rate-limit, and quota failures during discovery stop further requests in that update.
- Rate/quota recovery - Temporary failures use deterministic backoff.
The integration supports all standard SolaX Developer API device types plus its own internal EMS classification:
| Type | Device family |
|---|---|
1 |
Inverter |
2 |
Battery |
3 |
Meter |
4 |
EV charger |
100 |
Internal integration type for EMS systems discovered through dedicated EMS/master-control endpoints |
Types 1-4 are API-native deviceType values. Type 100 is used internally so EMS devices returned by the dedicated EMS endpoints can participate consistently in Home Assistant device and capability handling.
Model names are resolved using the combination of business type, device type, and model code where the Developer API provides enough context.
Residential inverter model mappings
- X1-LX
- X-Hybrid
- X1-Hybrid-G3
- X1-Boost/Air/Mini
- X3-Hybrid-G1/G2
- X3-20K/30K
- X3-MIC/PRO
- X1-Smart
- X1-AC
- A1-Hybrid
- A1-FIT
- A1
- J1-ESS
- X3-Hybrid-G4
- X1-Hybrid-G4
- X3-MIC/PRO-G2
- X1-SPT
- X1-Boost-G4
- A1-HYB-G2
- A1-AC-G2
- A1-SMT-G2
- X1-Mini-G4
- X1-IES
- X3-IES
- X3-ULT
- X1-SMART-G2
- A1-Micro 1 in 1
- X1-Micro 2 in 1
- X1-Micro 4 in 1
- X1-Micro 4 in 1G2
- X1-Micro 2 in 1G2
- X3-AELIO
- X3-HYB-G4 PRO
- X3-NEO-LV
- X1-VAST
- X3-IES-P
- J3-ULT-LV-16.5K
- J3-ULT-30K
- J1-ESS-HB-2
- C3-IES
- X3-IES-A
- X1-IES-A
- X3-ULT-GLV
- X1-MINI-G4 PLUS
- X1-Reno-LV
- A1-HYB-G3
- X-MS 2700
- OG
- X1-SPT-10K/12K
- LVE
- AEGIS
- X3-AELIO (LA)
- X3-FTH
- X3-MGA-G2
- X1-Hybrid-LV
- X1-Lite-LV
- X3-GRAND-HV
- X3-FORTH-PLUS
- X3-MIC-G3
- X3-PRO-G3
- Monitor one or many authorized SolaX plants from a single Home Assistant integration.
- Combine inverter production, plant yield, meters, batteries, EV chargers, and confirmed EMS data in dashboards and automations.
- Add a readable meter or EMS manually when the Developer API supports direct reads but omits the device from inventory discovery.
- Temporarily increase realtime polling while viewing a dashboard without permanently consuming the same API budget.
- Download privacy-redacted raw and filtered API diagnostics when a model or account returns an unexpected field set.
- Prepare and validate control payloads safely; non-EV writes remain hard-blocked while EV charger writes require explicit opt-in.
Commercial and industrial inverter mappings
- X3-AELIO
- X3-TRENE-100KI
- X3-TRENE-100K
- X3-TRENE
- X3-PRO G2
- X3-FORTH
- X3-MEGA G2
- X3-GRAND
- X3-FORTH PLUS
Battery, meter, and EV charger mappings
C&I batteries
- TB-HR140
- TB-HR522
- TSYS-HS51
- TR-HR140
Residential meters
- Meter X
- M1-40
- M3-40
- M3-40-Dual
- M3-40-Wide
C&I meters
- CT
- DTSU666-CT
- UMG 103-CBM
- M3-40
- M3-40-Dual
- PRISMA-310A
EV chargers
- X1/X3-EVC
- X1/X3-EVC G1.1
- X1/X3-HAC
- J1-EVC
- A1-HAC
- C1/C3-HAC
An unknown model code does not prevent device creation. The integration keeps the raw code available for diagnostics and can still build sensors from returned telemetry.
The System Totals device always provides:
System AC PowerSystem DC PowerSystem Yield TodaySystem Yield LifetimeSystem Total EfficiencySystem HealthDevice ConnectivityAPI Rate Limit StatusPoll ProfileEffective Scan IntervalLive View StateLive View RemainingLast Poll Attempt(diagnostic, disabled by default)Next Scheduled Poll(diagnostic, disabled by default)Token Expires AtDry-Run Command Count
Calculation attributes explain what is included:
- AC and DC power totals include inverter realtime data only.
- Non-inverter devices, including grid meters, are listed as excluded from inverter power totals.
- Yield totals aggregate plant realtime
dailyYieldandtotalYield. - Efficiency is
System AC Power / System DC Power × 100. - If AC and DC power are both zero, efficiency is reported as
0%. - System Health evaluates documented inverter, battery, and EV charger fault states together with active SolaX alarms. Normal modes such as Waiting, Idle, and Standby remain healthy.
- Device Connectivity independently evaluates SolaX
onlineStatusand, for manual devices without that field, realtime-data freshness. Its attributes list every online, offline, stale, or unknown device and the reason used.
Device sensors are generated from non-null fields returned for each device. Depending on hardware and account permissions, these can include:
- AC active, reactive, and apparent power
- DC, PV, and MPPT power/current/voltage
- Yield and energy totals
- Battery SOC, power, current, voltage, temperature, and status
- Meter import/export energy and active power
- Grid frequency, voltage, current, and power factor
- EPS/backup values
- EV charger state, charging power, current, and session values
- EMS system summary fields
- Device status, working mode, timestamps, and firmware/inventory metadata
Inverter friendly names omit the redundant Inverter prefix. Entity IDs retain device context and place the serial at the end:
sensor.<system>_<field>_device_<serial>
sensor.<system>_<field>_info_device_<serial>
- Fields that have produced real non-null data are remembered as device capabilities.
- A temporarily offline device can retain its known entities even when the current poll has no telemetry.
- Capability-only fields are created disabled by default.
- If a field later returns real data, an entity disabled by the integration is automatically enabled.
- User-disabled entities are never automatically re-enabled.
- Inventory diagnostics are generally disabled by default to avoid UI clutter.
Each plant can expose:
- Realtime plant fields
- Active alarm count
- Up to three alarm previews
- Annual and monthly statistics
- Plant inventory diagnostics
Available plant statistics are generated dynamically from API data rather than from a fixed universal sensor list.
Universal polling services are always registered. Capability-specific read services appear only when the loaded system supports them:
solax_developer_api.manual_refreshsolax_developer_api.start_live_viewsolax_developer_api.stop_live_viewsolax_developer_api.list_history_devicessolax_developer_api.fetch_device_historysolax_developer_api.list_alarm_targetssolax_developer_api.fetch_alarm_informationsolax_developer_api.list_plant_statistics_targetssolax_developer_api.fetch_plant_year_statisticssolax_developer_api.fetch_plant_month_statisticssolax_developer_api.query_request_resultsolax_developer_api.query_master_control_device
action: solax_developer_api.manual_refresh
data: {}
The integration supports one configured Developer API account, so read services automatically use the loaded config entry.
fetch_device_history is an on-demand read service. It:
- Accepts 1-200 serial numbers
- Fetches history one serial at a time because live SolaX API validation showed multi-serial history calls can return incomplete per-device rows
- Splits long time ranges into safe windows
- Merges and deduplicates returned history rows
- Caches the latest result for diagnostics
Required service fields:
sn_listdevice_typebusiness_typestart_timeend_timetime_interval
All Home Assistant service fields use snake_case.
list_plant_statistics_targets returns loaded plants without making an outbound SolaX API call.
fetch_plant_year_statistics is an on-demand read service for yearly plant graphs. It:
- Fetches monthly plant statistics with
dateType=2 - Uses January through the current month for the current year
- Uses January through December for previous years
- Returns chart-ready monthly rows and available metric names
- Does not write anything to Home Assistant Recorder or long-term statistics
fetch_plant_month_statistics is an on-demand read service for one month. It:
- Fetches one plant-statistics month with
dateType=2 - Returns chart-ready daily rows for that month
- Uses the same plant-statistics metric extraction as the plant sensors and yearly graph
- Does not write anything to Home Assistant Recorder or long-term statistics
Refresh the integration when a dashboard helper is turned on:
alias: Refresh SolaX when energy dashboard opens
triggers:
  - trigger: state
    entity_id: input_boolean.energy_dashboard_active
    to: "on"
actions:
  - action: solax_developer_api.manual_refresh
    data: {}
mode: restart
Start a short Live View session during a high-load check:
alias: SolaX live view for appliance test
triggers:
  - trigger: state
    entity_id: input_button.start_solax_appliance_test
actions:
  - action: solax_developer_api.start_live_view
    data:
      duration_seconds: 300
      interval_seconds: 10
mode: restart
Stop Live View explicitly when the test helper is cleared:
alias: Stop SolaX live view
triggers:
  - trigger: state
    entity_id: input_boolean.energy_dashboard_active
    to: "off"
actions:
  - action: solax_developer_api.stop_live_view
    data: {}
mode: restartControl services are registered only when compatible equipment is present.
Available control families
Grid and strategy
solax_developer_api.set_export_controlsolax_developer_api.set_import_control
Inverter work modes
solax_developer_api.batch_set_spontaneity_self_usesolax_developer_api.batch_set_on_grid_firstsolax_developer_api.batch_set_peace_modesolax_developer_api.batch_set_manual_modesolax_developer_api.self_use_modesolax_developer_api.feed_in_prioritysolax_developer_api.back_up_modesolax_developer_api.demand_modesolax_developer_api.const_power_mode
VPP
solax_developer_api.exit_vpp_modesolax_developer_api.power_control_modesolax_developer_api.electric_quantity_target_control_modesolax_developer_api.soc_target_control_modesolax_developer_api.push_power_positive_or_negative_modesolax_developer_api.push_power_zero_modesolax_developer_api.self_consume_charge_or_discharge_modesolax_developer_api.self_consume_charge_only_modesolax_developer_api.pv_and_bat_individual_setting_duration_modesolax_developer_api.pv_and_bat_individual_setting_target_soc_mode
EV charger
These direct hardware-control services require a Home Assistant administrator. For non-admin dashboards, use the EV charger's native button, select, and number entities; Home Assistant applies the user's entity control permissions.
solax_developer_api.set_charge_scenesolax_developer_api.set_evc_qr_codesolax_developer_api.set_evc_work_modesolax_developer_api.set_evc_start_modesolax_developer_api.set_evc_charge_commandsolax_developer_api.set_evc_reserve_chargesolax_developer_api.set_evc_current_limit
Battery and EMS
solax_developer_api.set_battery_heatingsolax_developer_api.set_ems_manual_mode
Every control service, EV charger device control, and inverter work-mode device action:
- Accepts documented
snake_caseHome Assistant fields. - Validates required fields, types, values, time formats, ranges, and serial limits.
- Converts validated fields to SolaX API-native names internally.
- Records a sanitized audit event.
- Keeps the existing non-EV charger control services hard-blocked as dry-runs; inverter mode buttons use a separate, reviewed execution path.
- Executes EV charger controls only when
EV Charger Controlsis enabled in options. - Requires a Home Assistant administrator for direct EV service calls; native EV entities remain governed by Home Assistant entity permissions.
- Checks the target device command status and
requestIdwhen SolaX provides them.
- Go to Settings → Devices & services.
- Open SolaX Developer API.
- Open the top-right menu (
⋮). - Select Download diagnostics.
- Attach the JSON file when opening a GitHub issue.
The diagnostics payload includes:
- Config-entry and polling metadata
- Coordinator health and refresh timing
- Latest raw API endpoint envelopes
- Filtered data used by entities
- Raw-versus-filtered field comparisons
- Manual-device and capability summaries
- Cached on-demand read results
- Collection issues and API errors, including incomplete inventory discovery
inventory_completeandinventory_errorsfrom the last discovery attempt, pluslast_update_partialandlast_errorsfor the latest update
A successful partial update can keep working devices available while reporting the failed requests. available requires a successful coordinator update and discovered plants or devices; an empty state containing only metadata is not considered available. Incomplete inventory remains flagged until a later discovery attempt succeeds.
Privacy handling:
- Client ID, client secret, authorization headers, and tokens are partially masked.
- Secret presence and length metadata are included without exposing the full value.
- Serial numbers have a six-character middle segment replaced with
***. - Plant ID, plant name, login name, plant address, longitude, and latitude are replaced with
*REDACTED*. token_expires_atremains visible because it contains no credential value.- Redaction is recursive across raw responses, filtered data, summaries, and cached results.
If the integration has no meaningful coordinator state, diagnostics attempts a safe one-time read-only probe and reports any probe errors without failing the download.
- Verify the Client ID and Client Secret in the SolaX Developer Portal.
- Confirm that the selected EU/CN/IN region matches the application.
- Confirm that the application has at least one authorized plant.
- Token success without a successful plant read is rejected intentionally.
Home Assistant starts the official reauthentication flow. Open the integration repair/configuration prompt and enter current credentials.
- Increase the standard scan interval.
- Reduce Live View duration or call budget.
- Allow the deterministic backoff period to complete.
- Check Settings → System → Repairs.
- Check the
API Rate Limit Statussensor.
The integration retains previous values while recovery is in progress.
Known device capabilities are cached. An inverter that stops uploading overnight can retain its existing entities instead of being rediscovered from an empty realtime response.
Current states can be unavailable until SolaX returns fresh data, but a temporary API failure does not erase the last successful coordinator model.
Some readable meters are not returned by page_device_info.
- Open Configure → Classic configuration → Manual devices (or the Devices tab in GUI configuration).
- Add the exact meter serial.
- Let the integration validate realtime access.
After restart, the saved manual meter remains part of inventory polling and appears as its own Energy Meter device.
- Confirm the device still appears under Configure → Classic configuration → Manual devices (or the Devices tab in GUI configuration).
- Download diagnostics and inspect
manual_meter_config_presentor the manual-device summary. - Recheck that the API still returns matching realtime data for the saved serial.
That is expected when the account has no confirmed EMS. EMS discovery, entities, and controls are capability-driven and hidden when irrelevant. Manual EMS onboarding is offered only for a relevant C&I plant or an existing manual EMS entry.
- The API returns different fields for different models and system configurations.
- Null-only or unsupported fields are not enabled by default.
- Three-phase, battery, EPS, meter, and EV fields appear only when the system returns them.
- If an integration-disabled capability field later receives real data, it is automatically enabled.
- Batteries returned without their own serial are queried through the associated inverter and their sensors appear on that inverter device. A battery returned with its own serial appears as a separate Battery device.
Call:
action: solax_developer_api.manual_refresh
data: {}Download diagnostics and open an issue:
Never post unredacted credentials or Developer Portal secrets.
- SolaX controls endpoint access, field availability, data latency, quotas, and the documented 100-calls-per-minute account limit.
- The API can return different fields for different models, firmware versions, business types, regions, account permissions, and installed equipment.
- Some meters and EMS systems are readable by serial but absent from inventory endpoints; these require manual validated onboarding.
- Device history remains an on-demand read service. It does not write historical API samples into Home Assistant's recorder.
- Callback URL push processing is not implemented.
- Non-EV direct control services are schema-validated hard-blocked dry-runs. Reviewed inverter work-mode device actions and EV charger controls can send outbound write requests only when their separate options are enabled. Direct EV services require an administrator; native entities use Home Assistant entity permissions.
- A device that is offline can retain its known entities, but current values can remain unavailable until SolaX returns fresh telemetry.
Included languages:
- English (
en) - default and fallback - German (
de) - Dutch (
nl) - Czech (
cs) - Polish (
pl) - Portuguese (
pt) - Brazilian Portuguese (
pt-BR) - Spanish (
es) - Latin American Spanish (
es-419) - Italian (
it) - French (
fr) - Swedish (
sv) - Danish (
da) - Norwegian Bokmål (
nb) - Finnish (
fi) - Lithuanian (
lt) - Simplified Chinese (
zh-Hans) - Japanese (
ja) - Thai (
th) - Vietnamese (
vi) - Bulgarian (
bg) - Greek (
el) - Hungarian (
hu) - Romanian (
ro) - Turkish (
tr) - Ukrainian (
uk)
The official Home Assistant translation files and runtime translation catalogs are validated for key and placeholder parity.
The integration ships local SolaX icon and logo assets in custom_components/solax_developer_api/brand/.
Home Assistant 2026.3.0 and newer automatically loads these local brand assets and serves them through:
/api/brands/integration/solax_developer_api/icon/api/brands/integration/solax_developer_api/logo
Home Assistant 2026.1 and 2026.2 fully support the integration but display Home Assistant's default integration icon because those releases cannot load local brand assets from custom integrations. There is no supported integration-level override for those versions; upgrade to Home Assistant 2026.3 or newer to display the bundled SolaX icon throughout Home Assistant.
The repository also includes assets/icon.png for this README and HACS presentation.
Found a bug or have a feature request?
Contributions for additional tested device fields, model mappings, translations, and Developer API account variants are welcome.
When reporting API differences, include privacy-redacted diagnostics and describe the device family, business type, and API region.
Update the manifest version and add its changelog entry, then push the matching version tag. In GitHub, open Actions → Create Draft Release, select main, enter the existing tag, and run the workflow. It checks the tagged source with the Home Assistant test suites, typing, HACS validation, and Hassfest before creating a draft release with the integration ZIP. Review the generated notes, fill in Help received this release if needed, and publish the draft manually. For a public test release, select Set as a pre-release when publishing the draft; Marketplace and HACS users must enable beta versions for this repository to install it.
This project is licensed under the MIT License. See LICENSE.
This integration is not officially affiliated with SolaX Power.
Cloud data availability, update frequency, endpoint permissions, and API limits are controlled by SolaX. Use the integration and all future control functionality at your own risk.
- Home Assistant Quality Scale: Platinum-standard aligned custom integration
- Automated test coverage: 97.08%
- Credential-free automated tests: 253 plus 7 Home Assistant lifecycle fixture tests
- Hassfest: Zero invalid integrations
- Read functionality: Active
- Automatic discovery: Active
- Manual meter/EMS validation: Active
- Diagnostics and Repairs: Active
- Live View: Active
- Control functionality: Existing non-EV services remain dry-runs; inverter work-mode device actions and EV charger controls have separate explicit opt-ins
- Outbound write requests: Reviewed inverter mode actions and enabled EV charger controls only
- Callback URL async push processing: Deferred
This integration is designed to provide a robust, transparent, and privacy-conscious Home Assistant interface for the official SolaX Developer API.